

Connect through creativity
Teaching someone something fun is a total mood boost

September included several fun events and adventures (like this one!), and perhaps the most unusual was that I helped give a creative gift: a cake decorating lesson. I highly recommend connecting with someone through creativity. It is a total mood boost, and I imagine many of us would agree that we could use some mood boosts right about now.
How can I connect through creativity?
Connecting through creativity can look like so many things. In my case, the cake lesson involved about 5 hours of my time (planning, shopping, pre-baking, transit, the actual lesson), but your creative touchpoint need not be that involved. Here are a few simple ideas:
Share a favorite book recommendation with a book-loving friend. This could take seconds over text.
Create and share a playlist of music that is lighting you up right now. Depending on your music listening habits, this could be a super quick 10-minute task, or more involved.
Share your knowledge about gardening, crafts, art, music, food, etc. Again, the duration of time will vary but as a recent example, this summer I asked a couple of garden-savvy friends to walk a space with me for 10-15 minutes and share gardening recommendations. They dropped a ton of information and planting recommendations while I scribbled furiously and joyfully in a notebook.
My point is, connecting through creativity doesn’t have to be a big time investment. And in addition to being a mood boost, it’s also a way to nurture relationships.
This week’s episode
Before I get to the fun cake backstory, if you aren’t yet subscribed to Edit Your Life, search “edit your life” wherever you enjoy listening to podcasts, or you can hit the play button in the embeddable players at the Edit Your Life website or below. This week I took Thursday off since it was a holiday week + my birthday, but on Monday—speaking of book recommendations!—I dropped this Mini Edit including recommendations for 3 historically oriented books that I want everyone to read. Seriously, order them all today from your favorite independent bookstore or library!
The cake backstory
Back in August, my friend
and I were texting about my Mom’s massive birthday cake. She shared that her husband Nicco is a savvy baker—as in, he is the person who will watch Great British Bake Off then actually make Prue Leith’s chocolate caramel hobnobs—but newer to cakes. He was working on a cake and commented that he wished he could level up his cake decorating skills. Morra asked whether I would be willing to give Nicco a cake decorating lesson for his birthday in September.Like pretty much everything I have done in the past 20 years, I am not trained to teach cake decorating (though I did give a cake tutorial live during the pandemic LOL). However, I thought this was such a clever, creative birthday idea and told Morra that if she thought it would be fun and useful for Nicco, I was game. We put it on the calendar and in the interim I ran flavors + a cake concept by her (how to make a fancy looking cake with simple techniques) and made a plan. And then on a perfect fall Saturday, I showed up at their house with a couple of bags of gear and prepared items (cakes, fillings). The gift was a surprise, and as soon as Nicco realized what was happening, he washed his hands and was ready to dive in.
And it was SO FUN. Perhaps because my prior teaching experience is in psychology and violin—where the stakes always felt high and stressful—it felt energizing to teach someone something fun and to connect around creativity. And even if you are an amateur—as I consider myself to be with cakes—you just need to know a few more things than the person you are teaching in order for it to be useful!
I only had a few broad stroke ideas about what I wanted to teach Nicco, but as we talked, many learning nuggets emerged. Here’s what we covered:
Because we had a limited time frame (two hours), I baked the cake layers (Beatty’s Chocolate Cake via Ina Garten) the day before. However, since I like tall cakes and wanted to teach Nicco how to make an ombre cake (which needs height), I split the batter into three instead of two pans. Nicco saw the layers and immediately noted how even they were and asked about technique. I shared that weighing cake layers makes it easy. I use a cheapo postage scale and switch the measurement to grams for added precision. Since I have three of the same cake pan (so, they all weigh the same), I fill the three pans by eye, then weigh each of them and redistribute batter as needed to even out the layers. It works perfectly.
I shared in advance with Morra that a quality cake spinner is a game changer for cake decorating, so she bought one in advance as part of Nicco’s gift.
I brought a cake board. Nicco immediately asked why, and I explained that many people decorate their cakes on a dinner plate, which have a curved edge that makes creating flat edges difficult. Decorating cakes on a board also makes it easier to move the cake in and out of the refrigerator (see #8 below). I own a couple of cake stands that are flat and decorate on those if the cake is for home, but I have a stash of cake boards since I also make cakes to gift.
We made this vanilla buttercream on site, and I shared that because we were going to color icing and since we increased from two to three cake layers, we needed to multiply the buttercream. It stinks to run out of buttercream mid-project so I would always rather have more than not enough. We made three batches throughout the course of the lesson.
I shared some basic buttercream technique—that it’s important to cream the butter well in advance and add the confectionery sugar gradually, partially for better smoothness and partially so confectionery sugar doesn’t go flying everywhere. I also talked about how the particular balance of milk and salt in this recipe keeps it from being sickly sweet.
I showed Nicco how I use pieces of wax paper wedged under the cake edges to keep the cake board clean (see photo below).
I taught Nicco about crumb coating, which is a thin preliminary layer of icing before the full icing. This thin layer holds crumbs in place so you avoid that situation where you are trying to ice a bare cake and all of a sudden you have crumbs popping up everywhere in your icing.
We talked about the importance of chilling layers as you go. I believe chilling is essential for cake decorating and I’m not sure I have seen this detailed in recipes. As I decorate a cake I chill each layer after I crumb coat the layer to build up the strength of the cake and keep layers from sliding around. It was especially important that day because it was warm and the chocolate cake recipe I made has a very moist, open structure.
Because a filled cake makes cakes feel fancy and also offers a lovely taste element, I made this raspberry filling in advance, which was necessary since it needed to set for at least four hours. I taught Nicco how to make a buttercream fence for each layer by using a piping bag to lay down a thick frosting ring around each layer edge so it creates a barrier so the raspberry filling doesn’t ooze out the sides.
For the top (third) layer of the cake, I shared a tip that I learned from a child contestant on Kids Baking Championship (LOL). Flip the last cake layer upside down so the super flat bottom of your cake layer now makes a perfect flat top of your cake. Thank you, Kids Baking Championship contestant!
Even with all of our cooling of layers, it was a warm day, and once we finished the crumb coat, buttercream fence, and filling additions, the icing between the layers bulged out a little. I showed Nicco how to run a bench scraper around the edge of the cake while spinning the cake spinner so the sides are perfectly flat again.
I showed Nicco the life-changing magic of disposable icing bags and couplers, so you can switch piping tips in and out with the same icing bag.
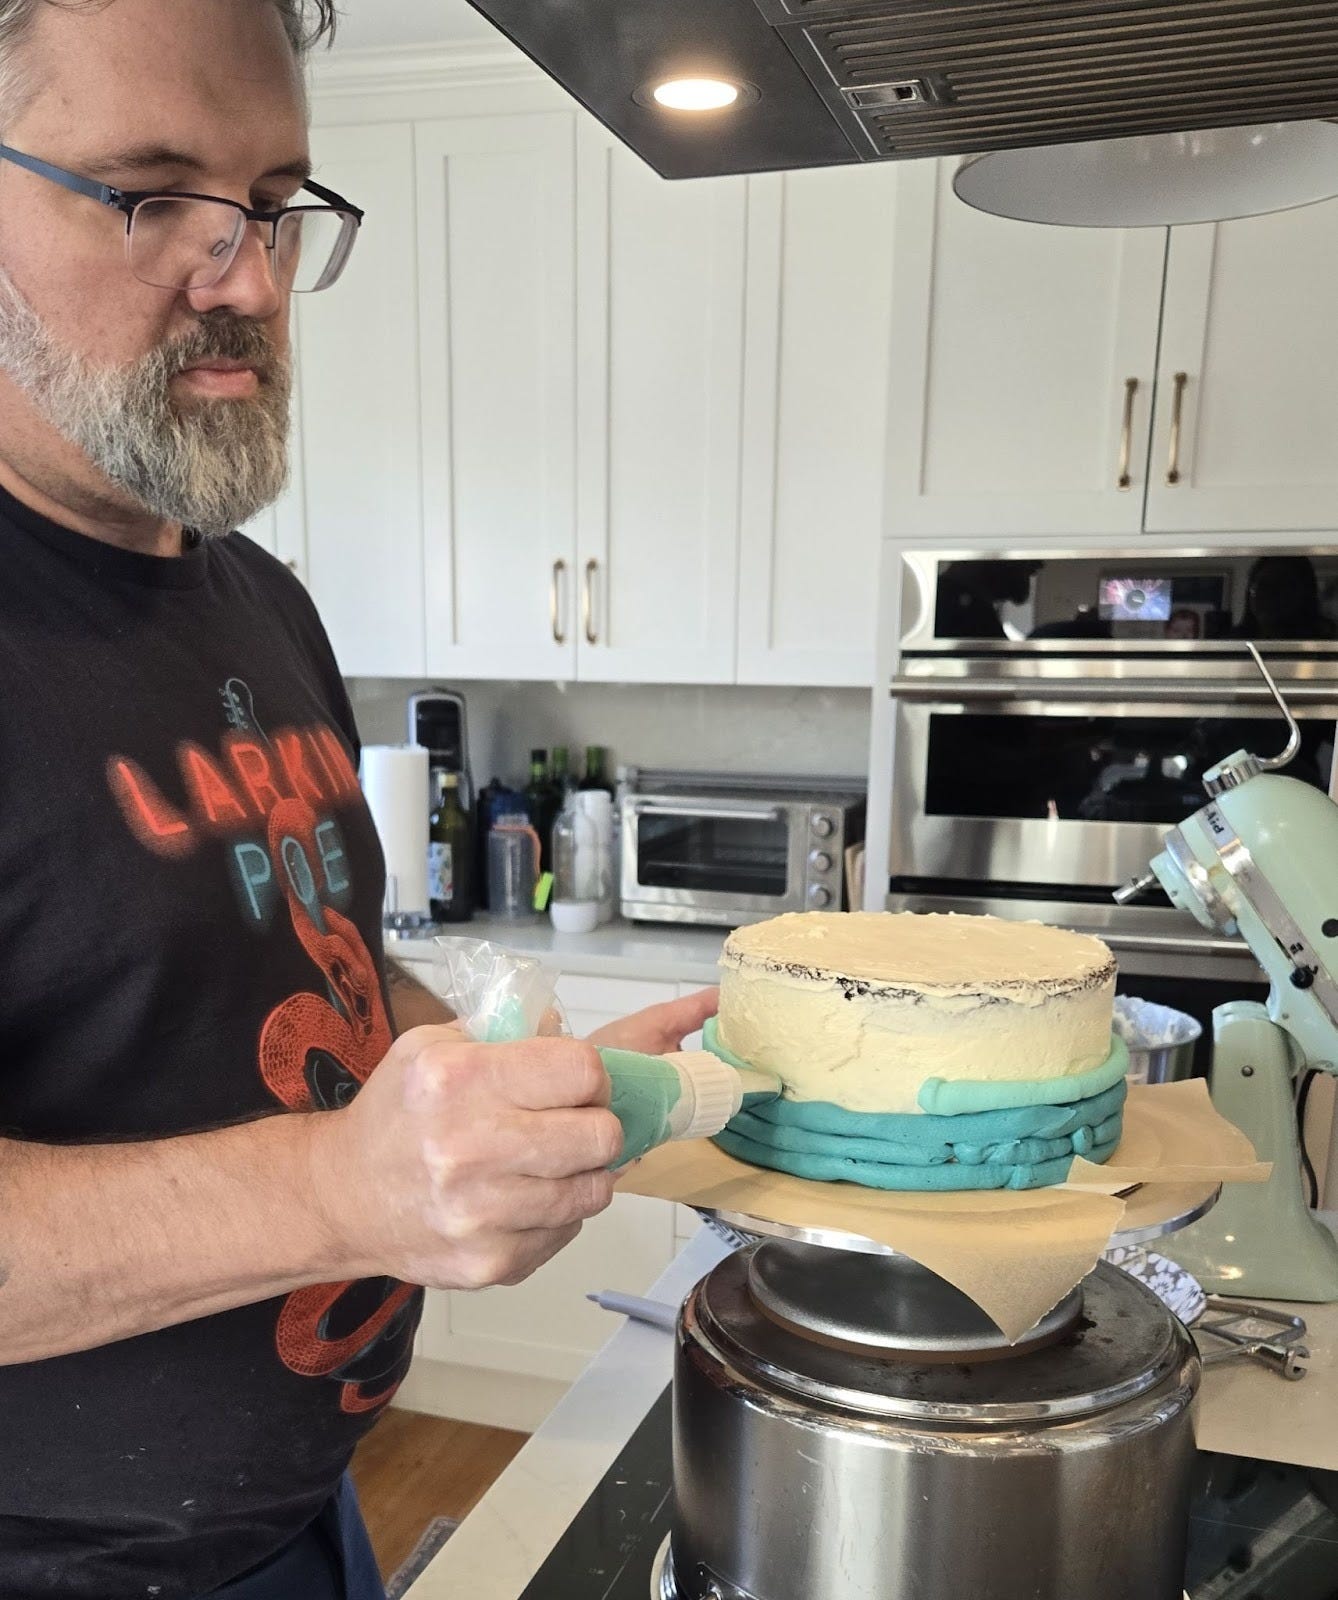
We talked about to mix icing colors; for an ombre cake we mixed two blues of varying depths.
I showed Nicco the ombre technique I use, which is to have three icing bags (in this case darker blue, lighter blue, white) at the ready with a large circle tip in each. Pipe all around the cake with the darker blue about a third of the way up the cake. Then switch and repeat with the lighter blue, then white (see photo below). Once the sides are covered, use the bench scraper while spinning the turntable to smooth the sides to create the ombre effect. So gorgeous! (See photo below.)
We didn’t end up doing this, but I told Nicco about another finishing technique to smooth out little imperfections when you are trying to get a cake’s finish really flat: heat up a bench scraper or metal spatula over the stove the gently flick it over the imperfections to smooth them out.
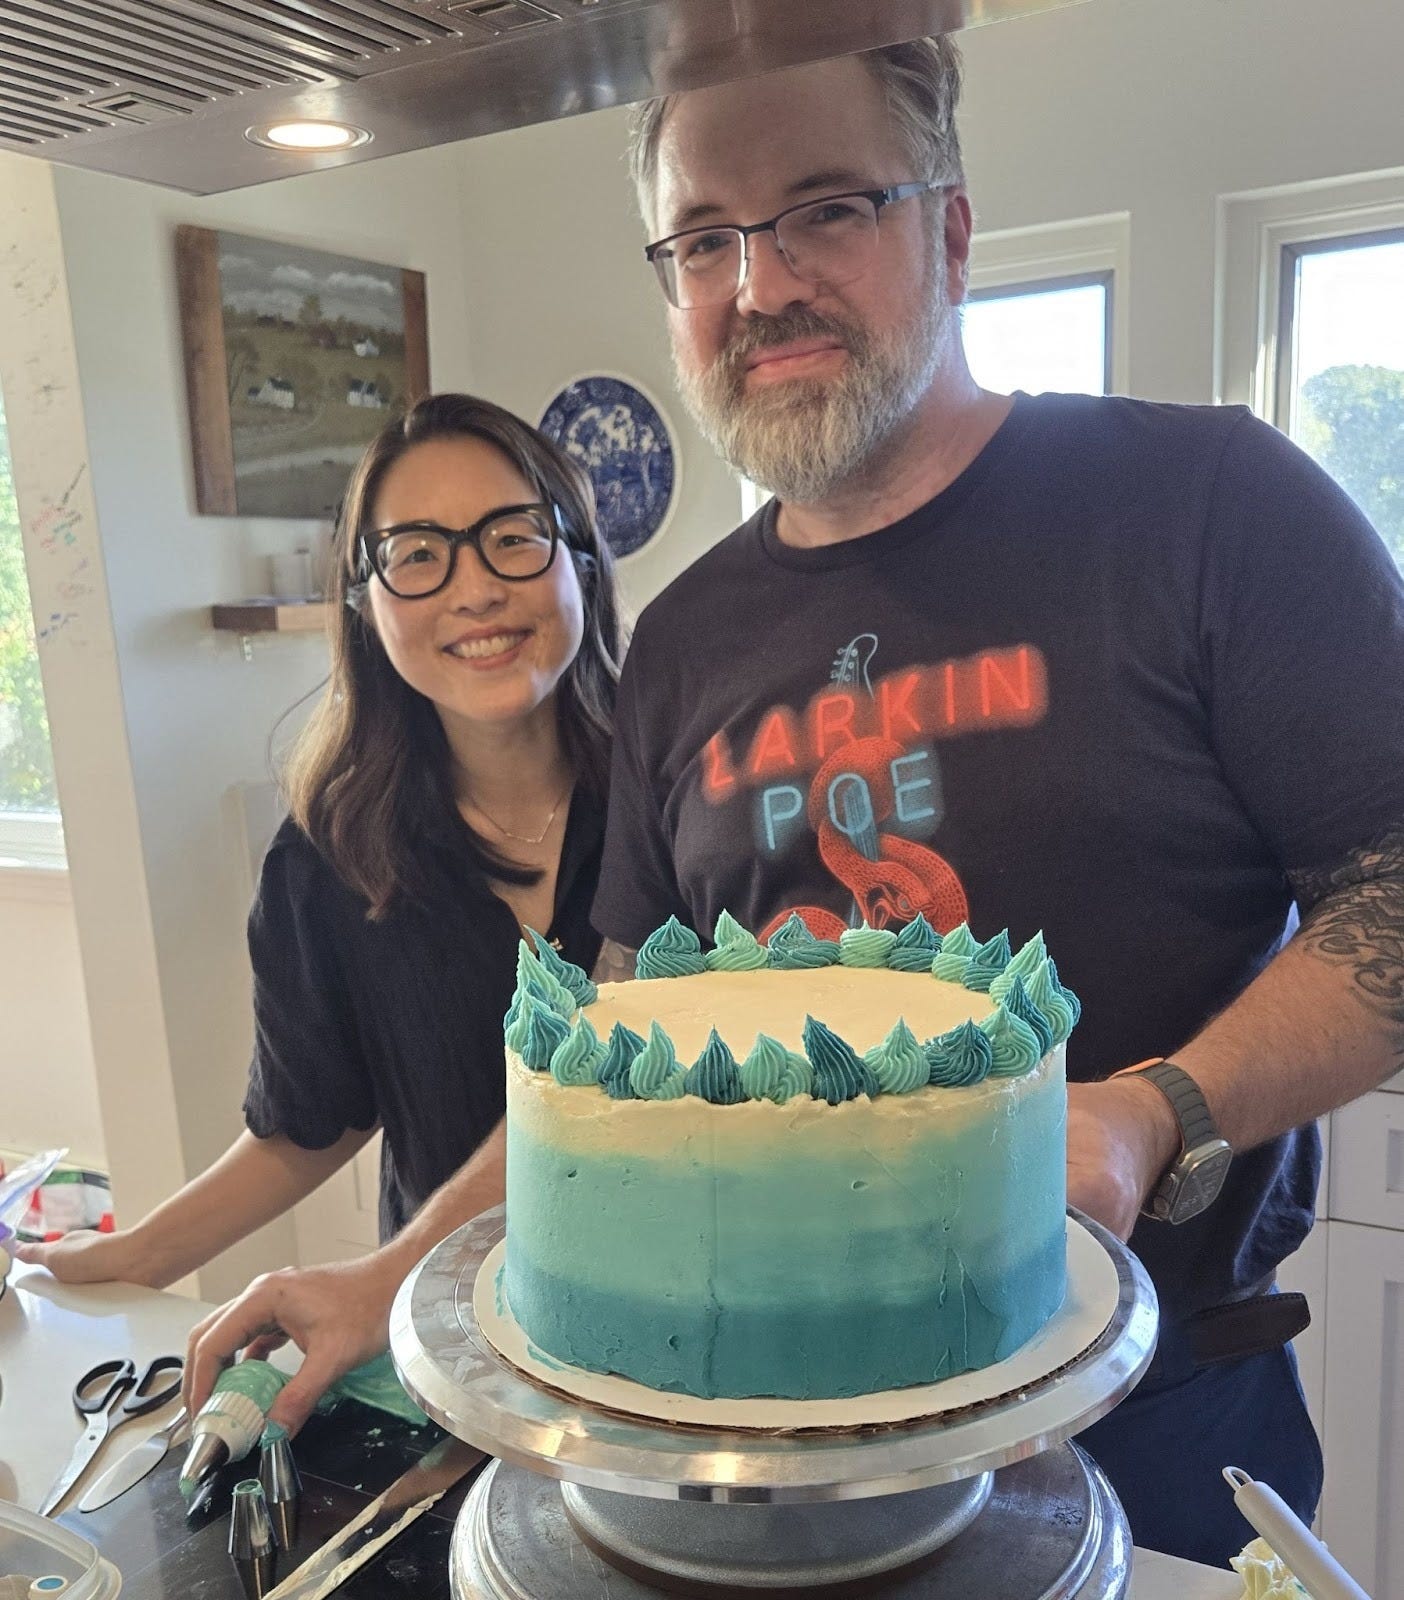
After we finished the ombre cake we had extra buttercream, so I showed Nicco how to switch the tips on the existing piping bags (thanks to the couplers) and pick fun tips to do accent piping along the top (and later he did the bottom too). (See photo below.)
At the end I also showed (on the top of the cake) how to run the tip of a spoon in a growing circle while spinning the turntable to create a spiral. The same technique can be used on the sides of a cake, which I like because it creates a rustic, pretty look and you don’t have to worry about perfectly flat sides.
Nicco was a fantastic student—relaxed yet curious. We did all of this in about two hours and I didn’t script anything out in advance. Who knew I had 17 cake decorating tips to share?! I just talked through the process based on what I have learned in my own amateur cake baking pursuits. It was tremendously fun and a heartening reminder of how wonderful it is to connect around creativity.
This was the best day!! Thank YOU!
Oh wow, Nicco looks like my long-lost brother I never knew I had. Also he has A+ beard shaping.